ナビゲーションメニューバーにメニュー名だけではく、英語で書き添えしたりしているこれのやり方です。 
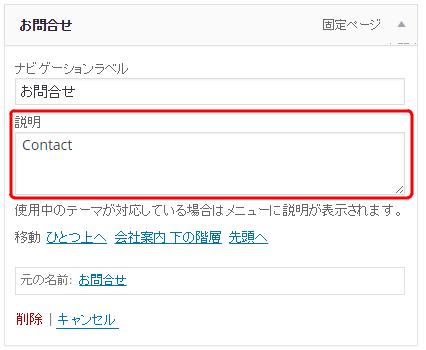
メニューに説明文を入力する説明欄は、外観→メニューの表示オプションで、□説明 にチェックをつけると表示されるようになります。
すると、こんな感じで説明を入れられるようになります。 
ただ、デフォルトでは説明はメモ扱いで、なにを入力しても表示はされません。 そこで、入力した説明をナビゲーションメニューに表示させる方法を。
- 1.出力されたメニューアイテムの文字列を置換する方法(フィルターフック)
- 2.ナビゲーションメニューの生成プログラムを上書きしてしまう方法(Walker_Nav_Menuクラスの関数start_elをオーバーライド)
の2つ、備忘録を兼ねて紹介します。
ナビゲーションメニューを利用できるようにする
そもそも、ナビゲーションメニューが利用できるようになっている必要があります。 もし、利用できるようになっていなければ、次のコードをfunction.phpに入れます。
|
1 2 3 4 5 6 7 8 |
add_theme_support( 'menus' ); if ( function_exists( 'register_nav_menus' ) ) { register_nav_menus( array( 'header-menu' => 'Header Menu', ) ); } |
で、header.phpに、
|
1 2 3 4 5 6 7 8 |
<?php wp_nav_menu( array( 'theme_location'=>'header-menu', 'container' => '', 'menu_class' => 'nav', 'link_before' => '<div>', 'link_after' => '</div>', 'items_wrap' => '<ul>%3$s</ul>', ));?> |
と入れておきます。
出力されたメニューアイテムの文字列を置換する方法(フィルターフック)
次のコードをfunction.phpに入れます。
|
1 2 3 4 5 6 7 |
function prefix_nav_description( $item_output, $item, $depth, $args ) { if ( !empty( $item->description ) ) { $item_output = str_replace( '">' . $args->link_before . $item->title, '">' . $args->link_before . '<strong>' . $item->title . '</strong>' . '<span class="menu-item-description">' . $item->description . '</span>' , $item_output ); } return $item_output; } add_filter( 'walker_nav_menu_start_el', 'prefix_nav_description', 10, 4 ); |
これで、メニュータイトルにタグで囲み、説目の部分はで囲まれて出力されるようになります。 なにやらごちゃごちゃやってますが、やっていることはシンプルで、str_replaceでもとの文字列からタグと説明付きの文字列に置換しているだけ。シンプルです。 参考にしたサイトさん:http://themefoundation.com/menu-item-descriptions/
ナビゲーションメニューの生成プログラムを上書きしてしまう方法(Walker_Nav_Menuクラスの関数start_elをオーバーライド)
もう一つの方法です。フィルターフックを使うのではなく、ナビゲーション・メニューを生成している関数をオーバーライドします。 オーバーライドというのは、プログラムそのものを一時的に上書きしてしまうんですが、まずは以下のコードをfunction.phpに追加します。
|
1 2 3 4 5 6 7 8 9 10 11 12 13 14 15 16 17 18 19 20 21 22 23 24 25 26 27 28 29 30 31 |
class description_walker extends Walker_Nav_Menu { function start_el(&$output, $item, $depth, $args) { global $wp_query; $indent = ( $depth ) ? str_repeat( "t", $depth ) : ''; $class_names = $value = ''; $classes = empty( $item->classes ) ? array() : (array) $item->classes; $class_names = join( ' ', apply_filters( 'nav_menu_css_class', array_filter( $classes ), $item ) ); $class_names = ' class="'. esc_attr( $class_names ) . '"'; $output .= $indent . '<li id="menu-item-'. $item->ID . '"' . $value . $class_names . '>'; $attributes = ! empty( $item->attr_title ) ? ' title="' . esc_attr( $item->attr_title ) . '"' : ''; $attributes .= ! empty( $item->target ) ? ' target="' . esc_attr( $item->target ) .'"' : ''; $attributes .= ! empty( $item->xfn ) ? ' rel="' . esc_attr( $item->xfn ) .'"' : ''; $attributes .= ! empty( $item->url ) ? ' href="' . esc_attr( $item->url ) .'"' : ''; $prepend = '<strong>'; $append = '</strong>'; $description = ! empty( $item->description ) ? '<span>'.esc_attr( $item->description ).'</span>' : ''; if($depth != 0) { $description = $append = $prepend = ""; } $item_output = $args->before; $item_output .= '<a'. $attributes .'>'; $item_output .= $args->link_before .$prepend.apply_filters( 'the_title', $item->title, $item->ID ).$append; $item_output .= $description.$args->link_after; $item_output .= '</a>'; $item_output .= $args->after; $output .= apply_filters( 'walker_nav_menu_start_el', $item_output, $item, $depth, $args ); } } |
start_el関数が、ナビゲーション・メニューの文字列を生成している関数になってるので、それをそのまま上書きしてて、
|
1 2 |
$prepend = '<strong>'; $append = '</strong>'; |
の部分で、メニュータイトルをで囲んで、
|
1 |
$description = ! empty( $item->description ) ? '<span>'.esc_attr( $item->description ).'</span>' : ''; |
の部分で、タグで囲んだ説明文を作っています。 今度は、header.phpにあるナビゲーションメニューの出力部分を変えます。 で、header.phpに、
|
1 2 3 4 5 6 7 8 |
<?php wp_nav_menu( array( 'theme_location'=>'header-menu', 'container' => '', 'menu_class' => 'nav', 'link_before' => '<div>', 'link_after' => '</div>', 'items_wrap' => '<ul>%3$s</ul>', ));?> |
となっているとしたら、arrayの部分に、 ‘walker’ => new description_walker()を追加します。
|
1 2 3 4 5 6 7 8 9 |
<?php wp_nav_menu( array( 'theme_location'=>'header-menu', 'container' => '', 'menu_class' => 'nav', 'link_before' => '<div>', 'link_after' => '</div>', 'items_wrap' => '<ul>%3$s</ul>', 'walker' => new description_walker(), ));?> |
これで、説明が追加されるはずです。 参考にしたサイトさん:http://www.kriesi.at/archives/improve-your-wordpress-navigation-menu-output
CSSでデザインを当てる
あとは、cssを当ててやればOK。
|
1 2 3 4 5 6 7 8 9 10 11 12 13 14 15 16 17 18 19 20 21 22 23 24 25 26 27 28 29 30 31 |
.nav { overflow: auto; float: right; width: 840px; padding: 0 ; } .nav ul, .nav li { list-style: none; } .nav .menu-item a { float: left; display: block; height: 80px; width: 150px; padding: 0 10px 0 0; text-align: center; line-height: 1.2; } .nav .menu-item a strong{ font-size: 1.05em; margin-top: 40px; margin-bottom: 0; padding: 0; display: block; } .nav .menu-item a span { display: block; font-size: 80%; color: red; } |
.nav は、適宜変えてください。これで、説明付きのナビゲーションメニューになるはずです。

